JTL Wawi
JTL is an ERP system designed for small and medium-sized businesses, especially those operating online stores. It integrates with multiple sales channels, manages inventory, orders, shipping, and offers financial reporting and customizability. You can connect your JTL Wawi using the JTL Cloud for a seamless integration.
Features summary
The integration between Returnless and JTL Cloud offers two core capabilities:
- Search Order: Allows customers to find their sales orders directly within the Returnless return form.
- Create Return: Automatically push return orders into JTL Wawi.
💡 Prerequisites for Installation
To establish a connection, ensure you are running JTL Wawi version 1.10.12.0 or higher. To begin, follow these two essential guides:
Platform integration settings
Once the connection is established, your current JTL Wawi version will be displayed under Platform Version. If the version is not visible, click Refresh Integration Data.

Search orders
This feature enables customers to locate their order using an order number and a validation method.
Note on Product Images: There is a known issue where product images may not display on Wawi version 1.11.5 or older. Please upgrade to at least 1.11.6 to resolve this.
Configuration settings
In the JTL Wawi integration settings, you can customize the following:
| Setting | Description | Options |
| Validation Method | The field the consumer must provide to verify the order. | Email address, Postal code |
| Order Search Field | The JTL Wawi field representing the consumer's order number. | External order number, Order number |
| Allowed Item Types | Defines which item types appear in the return form. Unselected types will be hidden. | Item (default), Shipping, Voucher, Payment, etc. |
| Allowed custom fields for sales order | Specify which custom fields from the JTL sales order should be imported (separate by comma). | Text input |
| Allowed custom fields for sales order items | Specify which custom fields from the JTL sales order items should be imported (separate by comma). | Text input |

Create Return in JTL Wawi
This feature syncs all items from Returnless with a received quantity higher than 0 to JTL.
Note: Previously created returns are not filtered, so each synchronization creates a new, independent return record.
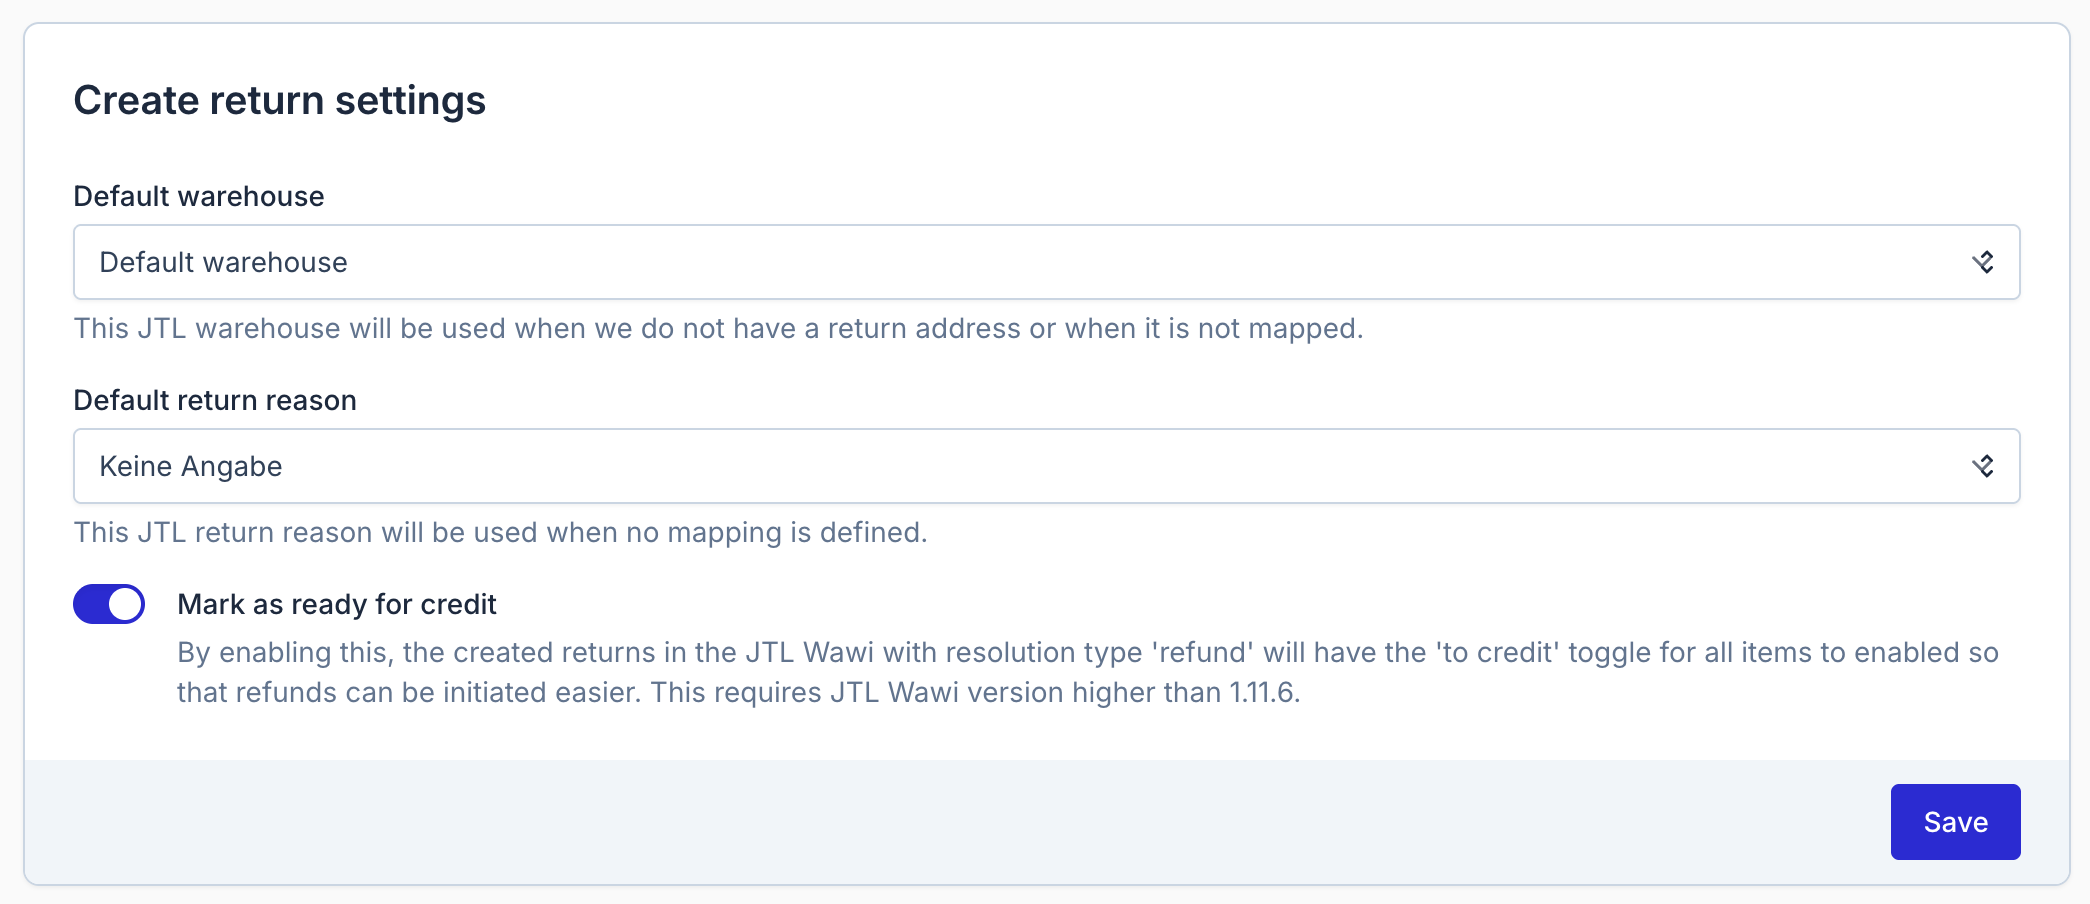
Create Return Settings
| Setting | Description | Options |
| Default warehouse | The destination warehouse if specific mapping is not configured. | List of JTL Wawi warehouses |
| Default return reasons | The fallback return reason if mapping is not configured. | List of JTL Wawi return reasons |
| Mark as ready for credit | Enables the 'to credit' toggle for 'refund' resolutions. (Requires version > 1.11.6). | Enabled / Disabled |

Status & Mapping
All new created returns get the Announced status in JTL-Wawi and are linked to a specific warehouse.

Warehouse Mapping: To make sure the correct warehouse is linked, a mapping is provided in the integration settings.

Return Reason Mapping: The return reasons for each item in the return will be mapped to the return reasons in JTL Wawi. A mapping is provided in the integration settings to make sure the correct return reason is used.

Refreshing Data: If you update warehouses or reasons in JTL, click Refresh integration data at the top of the page to sync the current available warehouses and return reasons in JTL Wawi.

Status update from JTL Wawi to Returnless
The Status Update feature ensures that when a return status changes in JTL Wawi, the Returnless status is updated automatically. This setup is ideal for businesses that utilize JTL WMS for warehouse operations but prefer Returnless to orchestrate the refund flow in another e-commerce platform (e.g., Shopify, Shopware, or Magento 2). Follow the steps below to enable this synchronization.
-
In the mapping section, assign JTL statuses to the corresponding Returnless statuses.

-
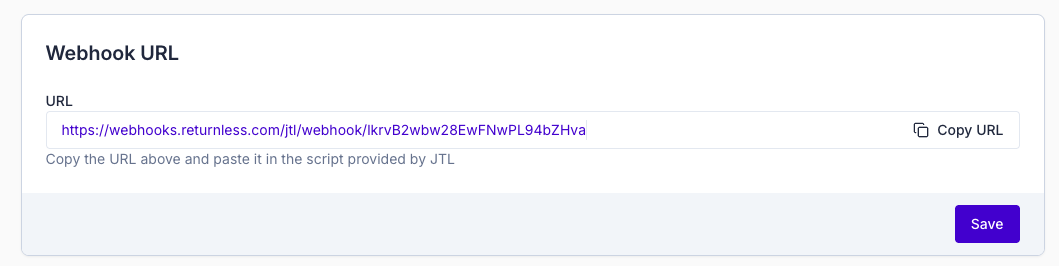
Scroll to the Webhook URL section and copy the provided URL for later use.
-
Create the necessary workflow in your JTL database using the query below.
🚨 Warning: This query is provided by JTL as an example. Executing it is at your own risk. Always create a full database backup before proceeding.


DELETE FROM dbo.tOptions
WHERE cKey = 'Workflow.WebhookUrl';

INSERT INTO dbo.tOptions (
    cKey,
    cValue
)
VALUES (
    N'Workflow.WebhookUrl',
    N'[WEBHOOK-URL]' — <—!!!!!'
);


IF EXISTS (SELECT 1 FROM sys.objects WHERE object_id = OBJECT_ID(N'CustomWorkflows._CreateWorkflowForStatus') AND type IN (N'P', N'PC'))
    DROP PROCEDURE CustomWorkflows._CreateWorkflowForStatus;
GO

CREATE PROCEDURE CustomWorkflows._CreateWorkflowForStatus
    @kRMStatus INT
AS
BEGIN
    SET NOCOUNT ON;

    DECLARE
        @nEvent     INT,
        @kWorkflow  INT,
        @XmlContent XML,
        @nextPos    INT;

    SET @XmlContent = N'
<jtlAktion xmlns="jtlCore.Workflows.Aktionen"
           xmlns:i="http://www.w3.org/2001/XMLSchema-instance"
           xmlns:a="http://schemas.datacontract.org/2004/07/jtlCore.Workflows.Aktionen"
           i:type="a:jtlAktionWebRequest">
  <CancelOnError>false</CancelOnError>
  <WawiVersion>1.10.12.0</WawiVersion>
  <a:Parameters i:nil="true" />
  <a:UseDotLiquidParameters>false</a:UseDotLiquidParameters>
  <a:Body>{% capture query -%}
SELECT specversion,
       type,
       source,
       id,
       time,
       datacontenttype,
       apiVersion,
       data
FROM CustomWorkflows.ReturnStatusUpdatedEvent
WHERE cRetoureNr = ''{{ Vorgang.Retourennummer }}''
FOR JSON PATH, WITHOUT_ARRAY_WRAPPER;
{% endcapture -%}
{{ query | DirectQueryScalar }}</a:Body>
  <a:Header>Content-Type: application/json</a:Header>
  <a:Method>2</a:Method>
  <a:NodePath />
  <a:SetWert>false</a:SetWert>
  <a:UriString>{% capture query -%}
SELECT cValue FROM dbo.tOptions WHERE cKey =''Workflow.WebhookUrl''
{% endcapture -%}
{{ query | DirectQueryScalar }}</a:UriString>
  <a:UseDotLiquidBody>true</a:UseDotLiquidBody>
  <a:UseDotLiquidHeader>true</a:UseDotLiquidHeader>
  <a:UseDotLiquidUriString>true</a:UseDotLiquidUriString>
  <a:WaitForResponse>false</a:WaitForResponse>
  <a:WriteHeaderValues>false</a:WriteHeaderValues>
</jtlAktion>';

    BEGIN TRY
        BEGIN TRANSACTION;

        -- 2.1 Determine or assign nEvent
        SELECT @nEvent = rwf.nEvent
        FROM dbo.tRMStatus AS s
        JOIN dbo.tRMStatusWorkflow AS rwf
          ON rwf.kRMStatus = s.kRMStatus
        WHERE s.kRMStatus = @kRMStatus;

        IF @nEvent IS NULL
        BEGIN
            SELECT @nEvent = ISNULL(MAX(nEvent), 0) + 1
            FROM dbo.tRMStatusWorkflow;
        END

        -- 2.2 Early exit: existing webhook action?
        SELECT TOP 1 @kWorkflow = rw.kWorkflow
        FROM dbo.tRMStatusWorkflow AS rw
        JOIN dbo.tWorkflowAktion  AS wa
          ON wa.kWorkflow = rw.kWorkflow
        WHERE rw.kRMStatus = @kRMStatus
          AND rw.nEvent    = @nEvent
          AND wa.cName     = '#GeneratedWebHook#';

        IF @kWorkflow IS NOT NULL
        BEGIN
            COMMIT TRANSACTION;
            SELECT @kWorkflow AS kWorkflow;
            RETURN;
        END

        -- 2.3 Insert into tWorkflow
        INSERT INTO dbo.tWorkflow (
            cName, nEvent, nObjekt, nVerknuepfung, nPos, nTyp, nApplikation,
            nSchedulerOptions, dtSchedulerTime, nSchedulerHour, nSchedulerMinute,
            nSchedulerDayValue, nSchedulerMonthValue
        )
        VALUES (
            'CallWebhook',
            @nEvent,
            15,
            0,
            2,
            0,
            15,
            0,
            NULL,
            0,
            0,
            0,
            0
        );

        SET @kWorkflow = SCOPE_IDENTITY();

        -- 2.4 Map status → workflow if new
        IF NOT EXISTS (
            SELECT 1
            FROM dbo.tRMStatusWorkflow
            WHERE kRMStatus = @kRMStatus
              AND nEvent    = @nEvent
              AND kWorkflow = @kWorkflow
        )
        BEGIN
            INSERT INTO dbo.tRMStatusWorkflow (
                kRMStatus, kWorkflow, nTyp, nEvent
            )
            VALUES (
                @kRMStatus,
                @kWorkflow,
                1,
                @nEvent
            );
        END

        -- 2.5 Determine next action position
        SELECT @nextPos = ISNULL(MAX(nPos), -1) + 1
        FROM dbo.tWorkflowAktion
        WHERE kWorkflow = @kWorkflow;

        -- 2.6 Insert the webhook action
        INSERT INTO dbo.tWorkflowAktion (
            kWorkflow, xXmlObjekt, nPos, cName
        )
        VALUES (
            @kWorkflow,
            @XmlContent,
            @nextPos,
            '#GeneratedWebHook#'
        );

        COMMIT TRANSACTION;
        SELECT @kWorkflow AS kWorkflow;
        RETURN;

    END TRY
    BEGIN CATCH
        ROLLBACK TRANSACTION;
        THROW;
    END CATCH
END;
GO

IF OBJECT_ID('CustomWorkflows.ReturnStatusUpdatedEvent', 'V') IS NOT NULL
    DROP VIEW CustomWorkflows.ReturnStatusUpdatedEvent;
GO

CREATE VIEW CustomWorkflows.ReturnStatusUpdatedEvent
AS
SELECT
    '1.0'                                                   AS specversion,
    'de.jtl-software.retoure.status.updated'                AS type,
    'Wawi'                                                  AS source,
    CAST(t.kRMRetoure AS VARCHAR(36))                       AS id,
    FORMAT(
        SYSDATETIMEOFFSET(),
        'yyyy-MM-dd''T''HH:mm:ss.fffK'
    )                                                       AS time,
    'application/json'                                      AS datacontenttype,
    '1'                                                     AS apiVersion,
    JSON_QUERY(
      (
        SELECT
          t2.kRMRetoure       AS Id,
          t2.kRMStatus        AS StateId,
          t2.kKunde           AS CustomerId,
          t2.cRetoureNr       AS Number,
          t2.cExternalNumber  AS ExternalNumber
        FROM dbo.tRMRetoure AS t2
        WHERE t2.kRMRetoure = t.kRMRetoure
        FOR JSON PATH, WITHOUT_ARRAY_WRAPPER
      )
    )                                                       AS data,
    t.cRetoureNr                                            AS cRetoureNr
FROM dbo.tRMRetoure AS t;
GO

DECLARE @kRMStatus INT;

DECLARE status_cursor CURSOR LOCAL FAST_FORWARD FOR
    SELECT kRMStatus
    FROM dbo.tRMStatus
    WHERE kRMStatus NOT IN (
        SELECT RmStatus.kRMStatus
        FROM dbo.tRMStatus AS RmStatus
        LEFT JOIN dbo.tRMStatusWorkflow AS RmWorkflow
          ON RmWorkflow.kRMStatus = RmStatus.kRMStatus
          AND RmWorkflow.nTyp = 1
        LEFT JOIN dbo.tWorkflow AS Workflow
          ON Workflow.kWorkflow = RmWorkflow.kWorkflow
        LEFT JOIN dbo.tWorkflowAktion AS Aktion
          ON Aktion.kWorkflow = Workflow.kWorkflow
          AND Aktion.cName = '#GeneratedWebHook#'
        WHERE Aktion.cName IS NOT NULL
    );

OPEN status_cursor;
FETCH NEXT FROM status_cursor INTO @kRMStatus;

WHILE @@FETCH_STATUS = 0
BEGIN
    EXEC CustomWorkflows._CreateWorkflowForStatus @kRMStatus;
    FETCH NEXT FROM status_cursor INTO @kRMStatus;
END

CLOSE status_cursor;
DEALLOCATE status_cursor;
GO

IF OBJECT_ID('dbo.trg_RMStatus_AfterInsert', 'TR') IS NOT NULL
    DROP TRIGGER dbo.trg_RMStatus_AfterInsert;
GO

CREATE TRIGGER dbo.trg_RMStatus_AfterInsert
ON dbo.tRMStatus
AFTER INSERT
AS
BEGIN
    SET NOCOUNT ON;

    DECLARE @kRMStatus INT;

    DECLARE status_cursor CURSOR LOCAL FAST_FORWARD FOR
        SELECT kRMStatus
        FROM inserted;

    OPEN status_cursor;
    FETCH NEXT FROM status_cursor INTO @kRMStatus;

    WHILE @@FETCH_STATUS = 0
    BEGIN
        EXEC CustomWorkflows._CreateWorkflowForStatus @kRMStatus;
        FETCH NEXT FROM status_cursor INTO @kRMStatus;
    END

    CLOSE status_cursor;
    DEALLOCATE status_cursor;
END;
GO
-
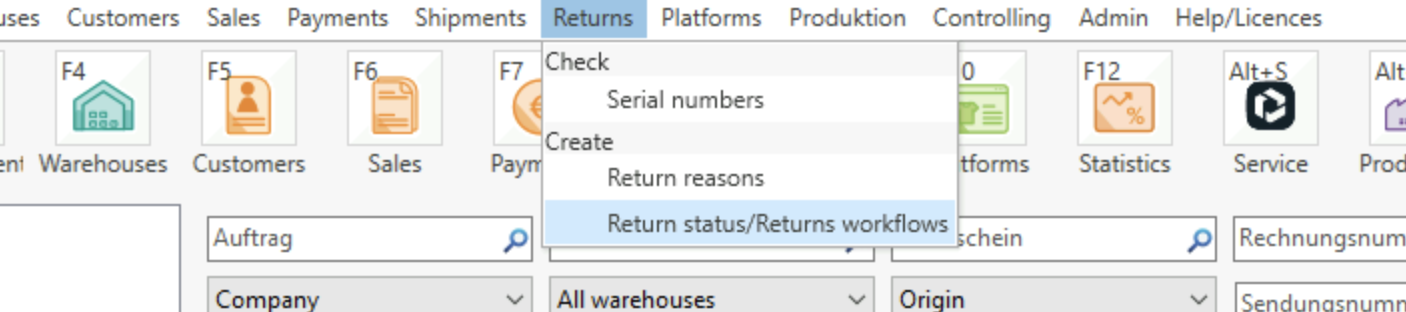
Open JTL Wawi and open the top menu to go to Returns > Return status / Returns workflows.
- In the overview, your return statuses are shown. Select a status to see the workflow section. Click on the workflow named GeneratedWebhook.
- In the Actions section, change the URL of the web request action to the Webhook URL you copied in Step 2.
- Repeat steps 5 and 6 for every status you want synchronized with Returnless.

Enabling the JTL-Wawi integration in your Return Form
To activate these features for your customers, you must enable them within the specific return form settings:
- Login to the Return panel and navigate to Settings > Return forms.
- Open the settings for the applicable form and select the Integrations tab.
Default Search Integration
Only one integration can serve as the main source for order lookups. To allow consumers to search for orders in JTL Wawi, select it in the Default Search Integration setting. This action automatically enables the Search Order feature for this integration.

Enabling Additional Features
Scroll down to the JTL Wawi section to toggle specific features (like Create Return) on or off. Click Save to apply changes.

Automatic refunds via JTL Wawi
If you prefer JTL Wawi to handle refunds rather than Returnless, you can set up a workflow to create refunds for all returns synced by Returnless.
Step 1: Enable "Mark as ready for credit" in Returnless
Before configuring JTL Wawi, you must ensure that Returnless sends the correct "credit" flag for each return item.
- In your Returnless panel, navigate to your JTL Wawi integration settings.
- Locate the Mark as ready for credit toggle.
-
Enable this toggle:
Note: When enabled, returns synced to JTL Wawi with the resolution type 'refund' will automatically have the 'to credit' (nGutschreiben) toggle set to enabled. This requires JTL Wawi version 1.11.6 or higher.
-
Click Save.

Step 2: Configure JTL Wawi Workflows
Once the integration is configured to flag items for credit, you can use the following SQL queries to automate the refund process within JTL.
🚨 Warning: These queries are provided as examples by JTL. Executing them is at your own risk. Ensure a database backup is created first.
- Execute query 1:
USE [eazybusiness]
GO
/****** Object:  StoredProcedure [CustomWorkflows].[spRetoureGutschreiben]    Script Date: 12.12.2025 11:57:43 ******/
SET ANSI_NULLS ON
GO
SET QUOTED_IDENTIFIER ON
GO
CREATE PROCEDURE [CustomWorkflows].[spRetoureGutschreiben]
@kRMRetourePos INT
AS
BEGIN
   UPDATE dbo.tRMRetourePos
   SET    dbo.tRMRetourePos.nGutschreiben = 1
   WHERE  dbo.tRMRetourePos.kRMRetourePos= @kRMRetourePos;
END
- Execute query 2:
INSERT INTO CustomWorkflows.tWorkflowObjects
(
   nObjekt,
   cName,
   cPkColumn
)
VALUES
(   14,   -- nObjekt - int
   N'RetourenPos', -- cName - nvarchar(100)
   N'kRMRetourePos'  -- cPkColumn - nvarchar(100)
   )
Step 3: Finalize Setup
- Restart JTL-Wawi completely after running the SQL queries.
- Navigate to Retoure > Retourenstatus / Retouren Workflow and select the desired status (e.g., Eingetroffen).
- Create a new workflow under the Workflow tab, defining the trigger and any specific conditions.
- Add the action to create an invoice (Gutschrift/Refund) under RetourenPosition.
- Activate and Save the workflow.
Should you have any questions during the setup process or require further assistance with your JTL Wawi integration, please don't hesitate to reach out to our support team.