Channable
Channable is the all-in-one platform that provides the solutions you need for greater visibility, smarter ad campaigns, and more personalized marketing.
Features summary
The platform integration with Channable offers the following features:
- Search order: Allow consumers to find their marketplace order in the Returnless return form.
- Return importer: Import returns from Channable when return announcement does not take place in Returnless.
- Finalize return: Mark the return as received so that Channable can initiate a refund.
Integration features can be automated using automations to reduce the amount of manual handling actions.
How to install
The connection with Channable is set up via the Channable API.
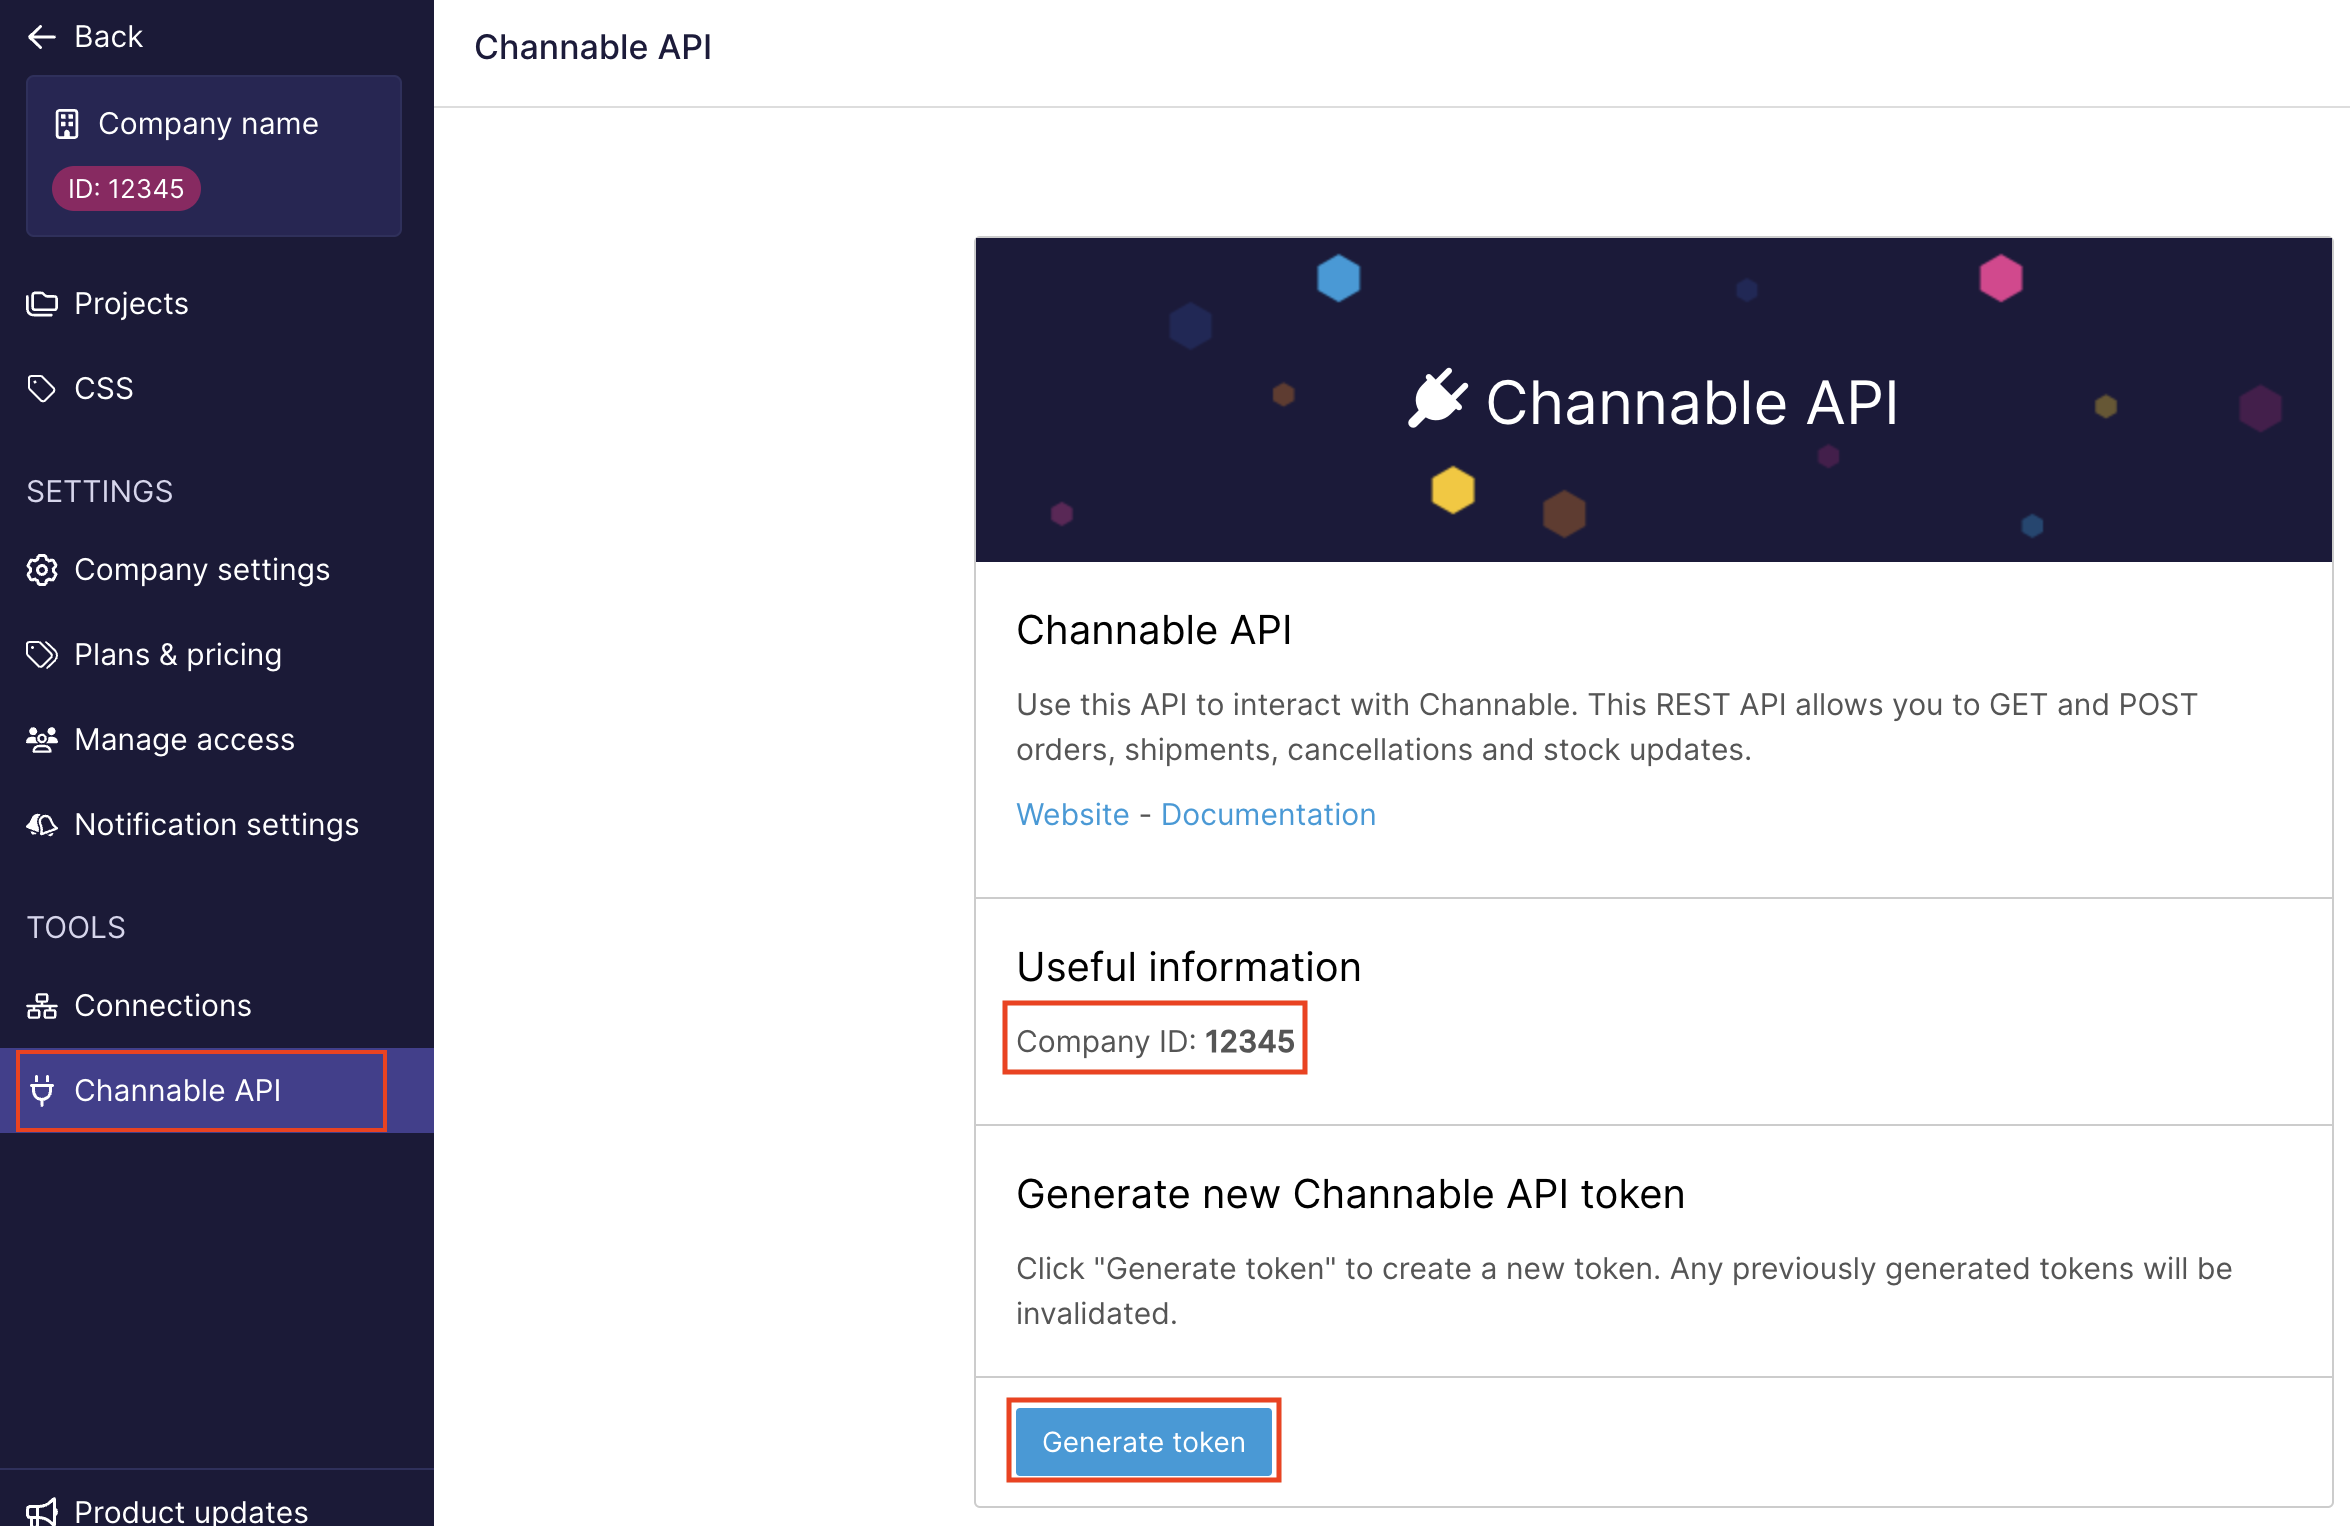
Generate Channable API credentials
To make a connection to your Channable portal, a Channable API token is required. If you already have one, make sure to use it. If no token has been generated already, you can create a new one by following these steps:
- Log in to your Channable portal.
- Select the company you wish to connect to Returnless.
- In the left menu under Tools, click on Channable API.
- Click Generate token.
- Make sure to write down both the Company ID and Token.
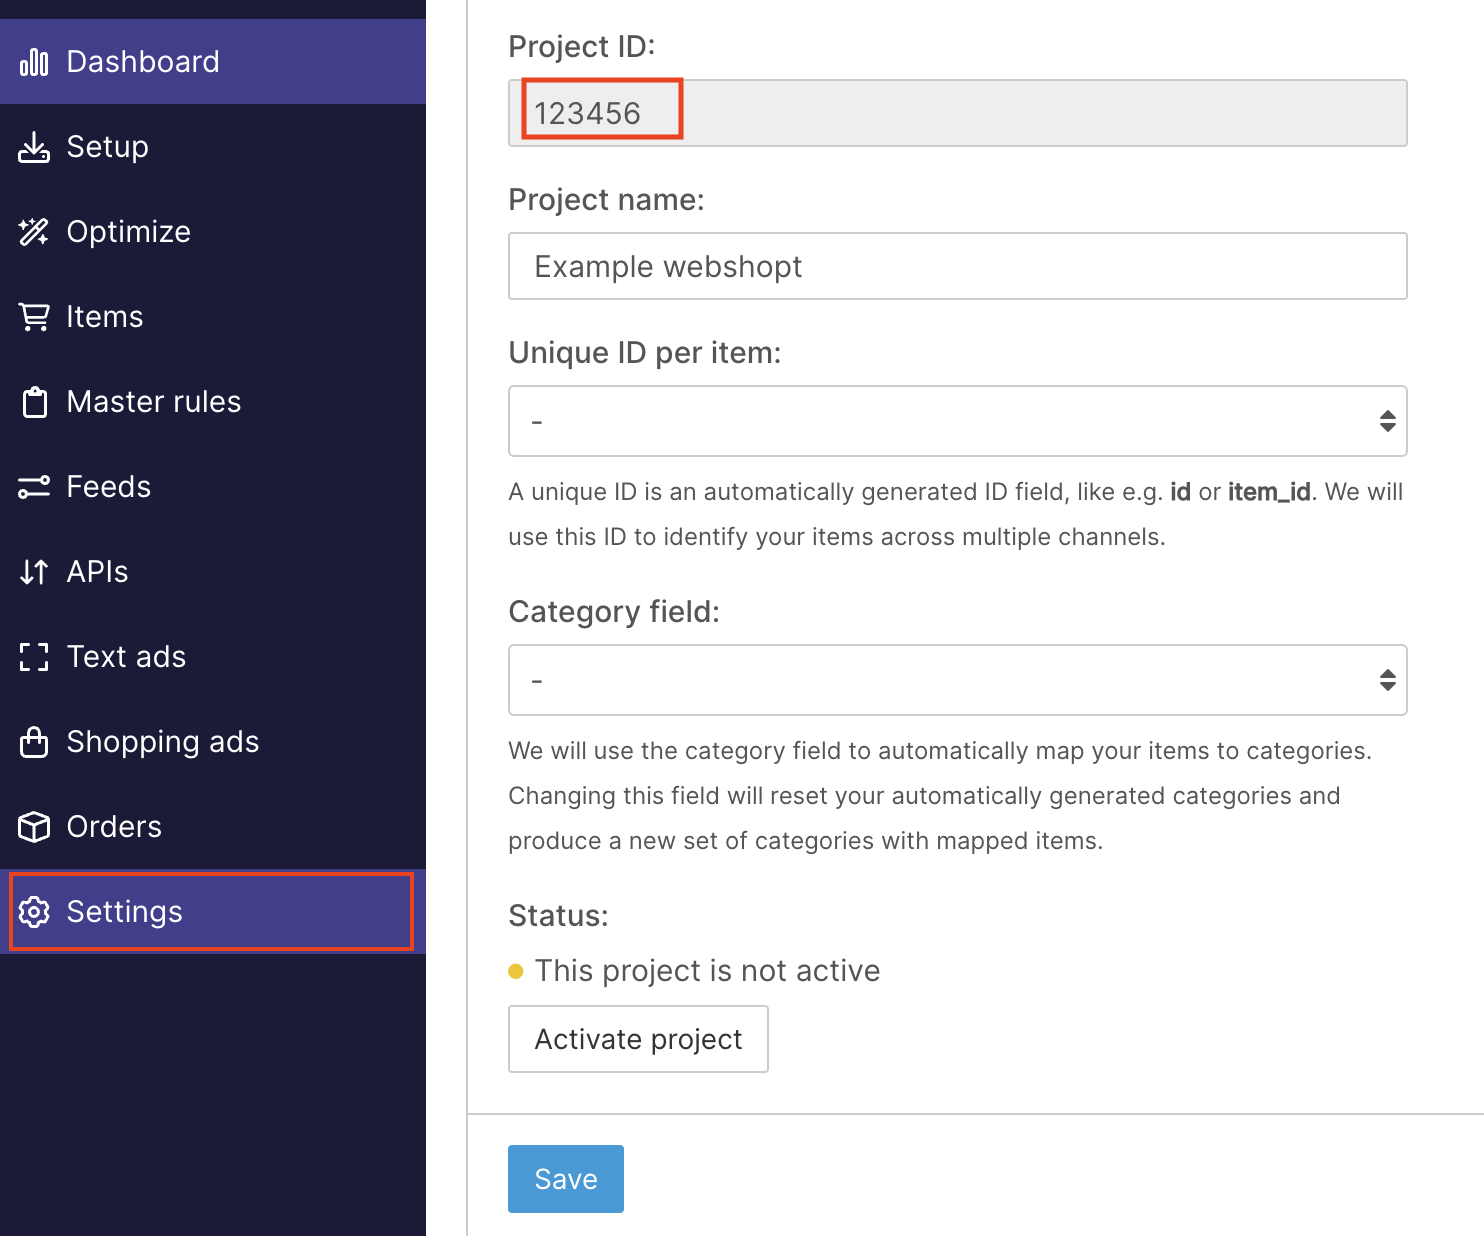
Retrieve Channable project ID
The project ID is also needed to set up the integration. To retrieve the ID, follow these steps:
- Log in to your Channable portal.
- Select the company you wish to connect to Returnless.
- The projects within your company will be shown. Select the desired project.
- Click on Settings.
- Write down the project ID.
Set up the integration
Next, an integration will have to be created in Returnless.
- Log in to the Returnless panel and
-
Navigate to Settings > Integrations page.
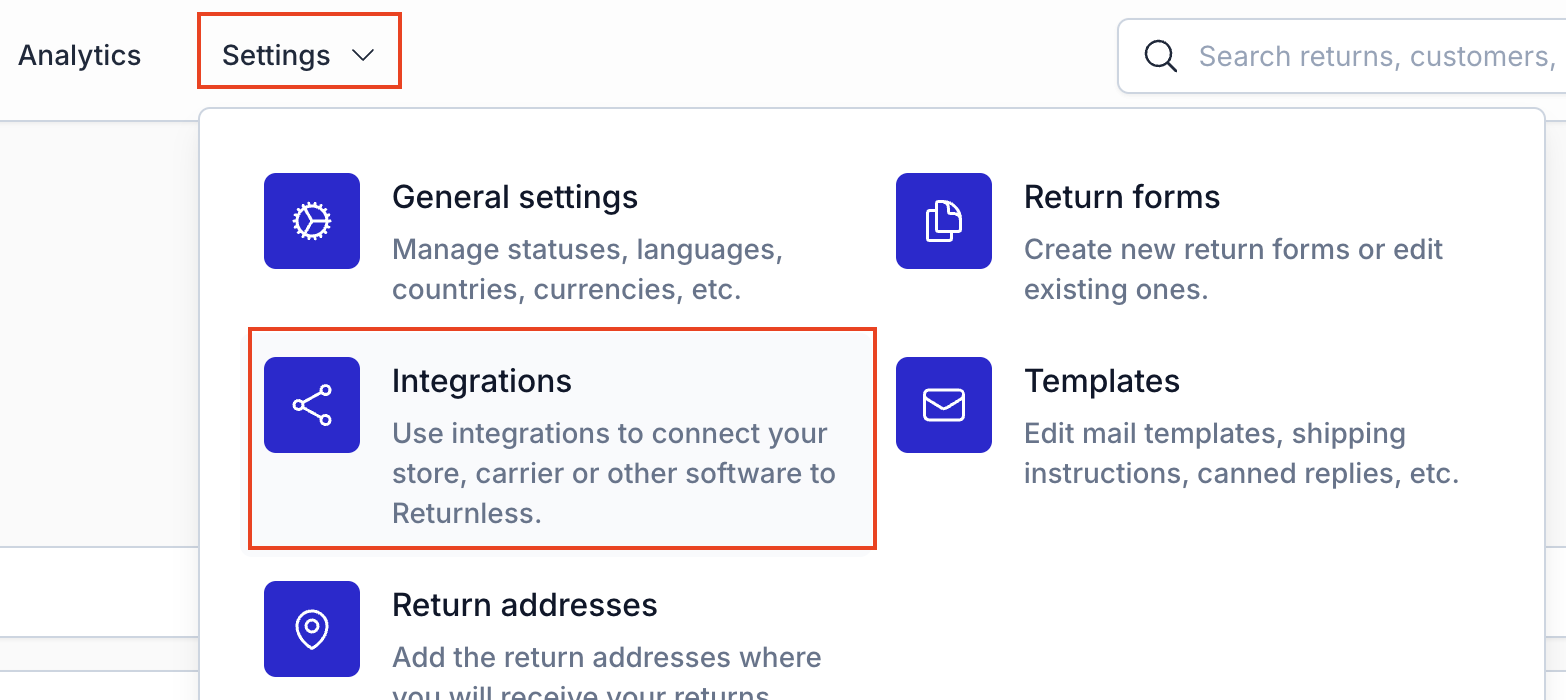
- Click on the Add new integration button in the e-commerce platform section.
- Select the Channable integration. A modal will open, asking you to enter the Title, Description, Company ID, Project ID and API token.
- Fill in the fields and click on Verify integration.

| Setting | What to provide |
|---|---|
| Title | Name of the integration |
| Description | Description of the integration |
| Company ID | The company that was shown when the Channable API token was created |
| Project ID | The ID of the project. This can be found by going to project settings in Channable |
| API token | The Channable API token that was generated in the Generate Channable API credentials section |
How to use features
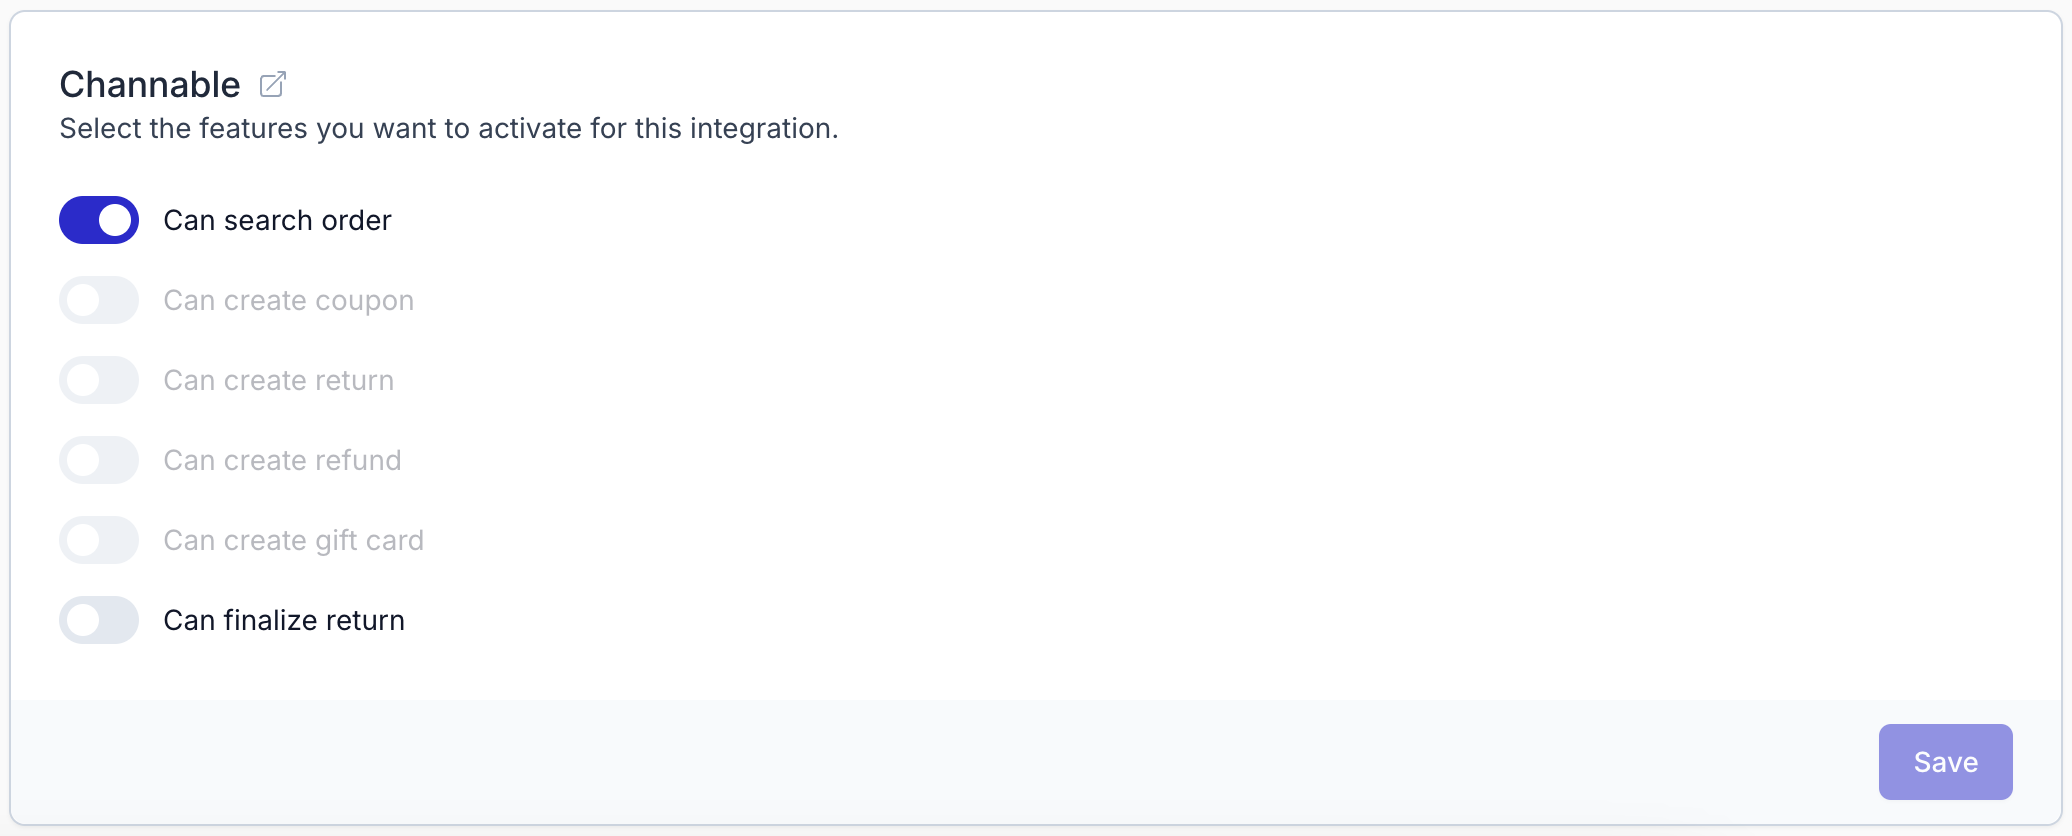
By default, all features will be disabled for the integration. Make sure to activate the features you wish to use.
All integration features will be usable in the return detail page in the form of a button or they can be automated by using the automations feature to reduce the amount of manual handling actions. The only two exceptions are the Search order and Return importer feature.
Activate features
By default, all features will be disabled. In order to start using a feature, make sure to enable the integration in a return form.
To view the feature settings, follow these steps:
- Login to your Return panel
- Navigate to Settings > Return forms and open the settings of the applicable return form.
- Go to the Integrations tab.
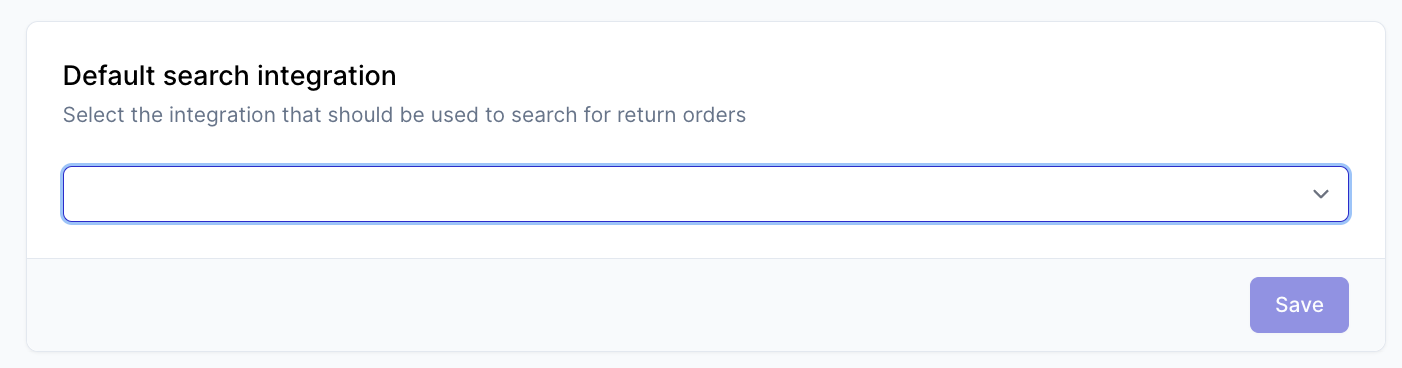
Here you will be able to define the default search integration and enable features.
Default search integration
Only a single integration will be used as the main source for the orders. If consumers need to look up the order in Channable, make sure to set this in the default search integration setting. Doing this will automatically enable the Search order feature in the integration features overview for the integration.
Enable features
Other features can be toggled in the same overview. Scroll down to the Channable section. Here you will see all available features and whether they are on or off. If you want to enable or disable a feature you can change it here and then click on Save.
Search order
With the search order feature, consumers will be able to find their marketplace order in the Returnless return form by using their marketplace order number.
As Channable does not have support for images via the API, consumers will not be able to see product images in the return form when using this integration as the default search integration.
Search order settings
| Setting | Description | Options |
|---|---|---|
| Validation method | What field should the consumer fill in when looking up the order | Email address, Postcode. |
| Shipping status filter | What shipment status is required for the order to be found in the search order functionality. If not filled in, all options are allowed. |
Single select Channable shipping status: None, Awaiting confirmation, Cancellation request, Cancelled, Manual, Not shipped, Partial, Pending cancellation, Pending shipment, Processing, Shipped, Waiting. |
Return importer
Important: Return importers will not run for return forms that are in test mode.
Returnless will fetch all returns in Channable on an hourly basis. The returns will be fetched every hour at 5 minutes to the full hour (8:55, 9:55, ...). These returns will be added to Returnless as returns so that the handling process can take place in Returnless.
Keep in mind that returns can only be imported if they exist in Channable. Not all channels will create a return in Channable. For information about which channels support returns in Channable, refer to the Channable documentation.
As Channable does not have support for images via the API, the imported returns will not include product images in Returnless.
Importer settings
| Setting | Description |
|---|---|
| Enable importer | Enable this toggle to start importing returns. Returnless will only import returns that have been created since the start of the day the importer has been enabled. |
| Import to form |
Returns need to be attached to a return form in Returnless. Some settings (like email notifications and automations) can be configured in the form. By default, a virtual form is used to attach the imported returns. A virtual form is only used internally and is not visible to your customers. It also does not support automations. If you want to attach the returns to one of your existing forms, you can choose the applicable form. |
| Default return status | Select the status that new returns should have by default. |
| Filter on channels | Channels that are selected here will be imported. If no channels are selected Returnless will import the returns of all channels. |
| Filter on return statuses | Select which Channable return statuses should be imported. If no status is selected, all returns will be imported. We suggest to only import returns that are New or In Progress. |
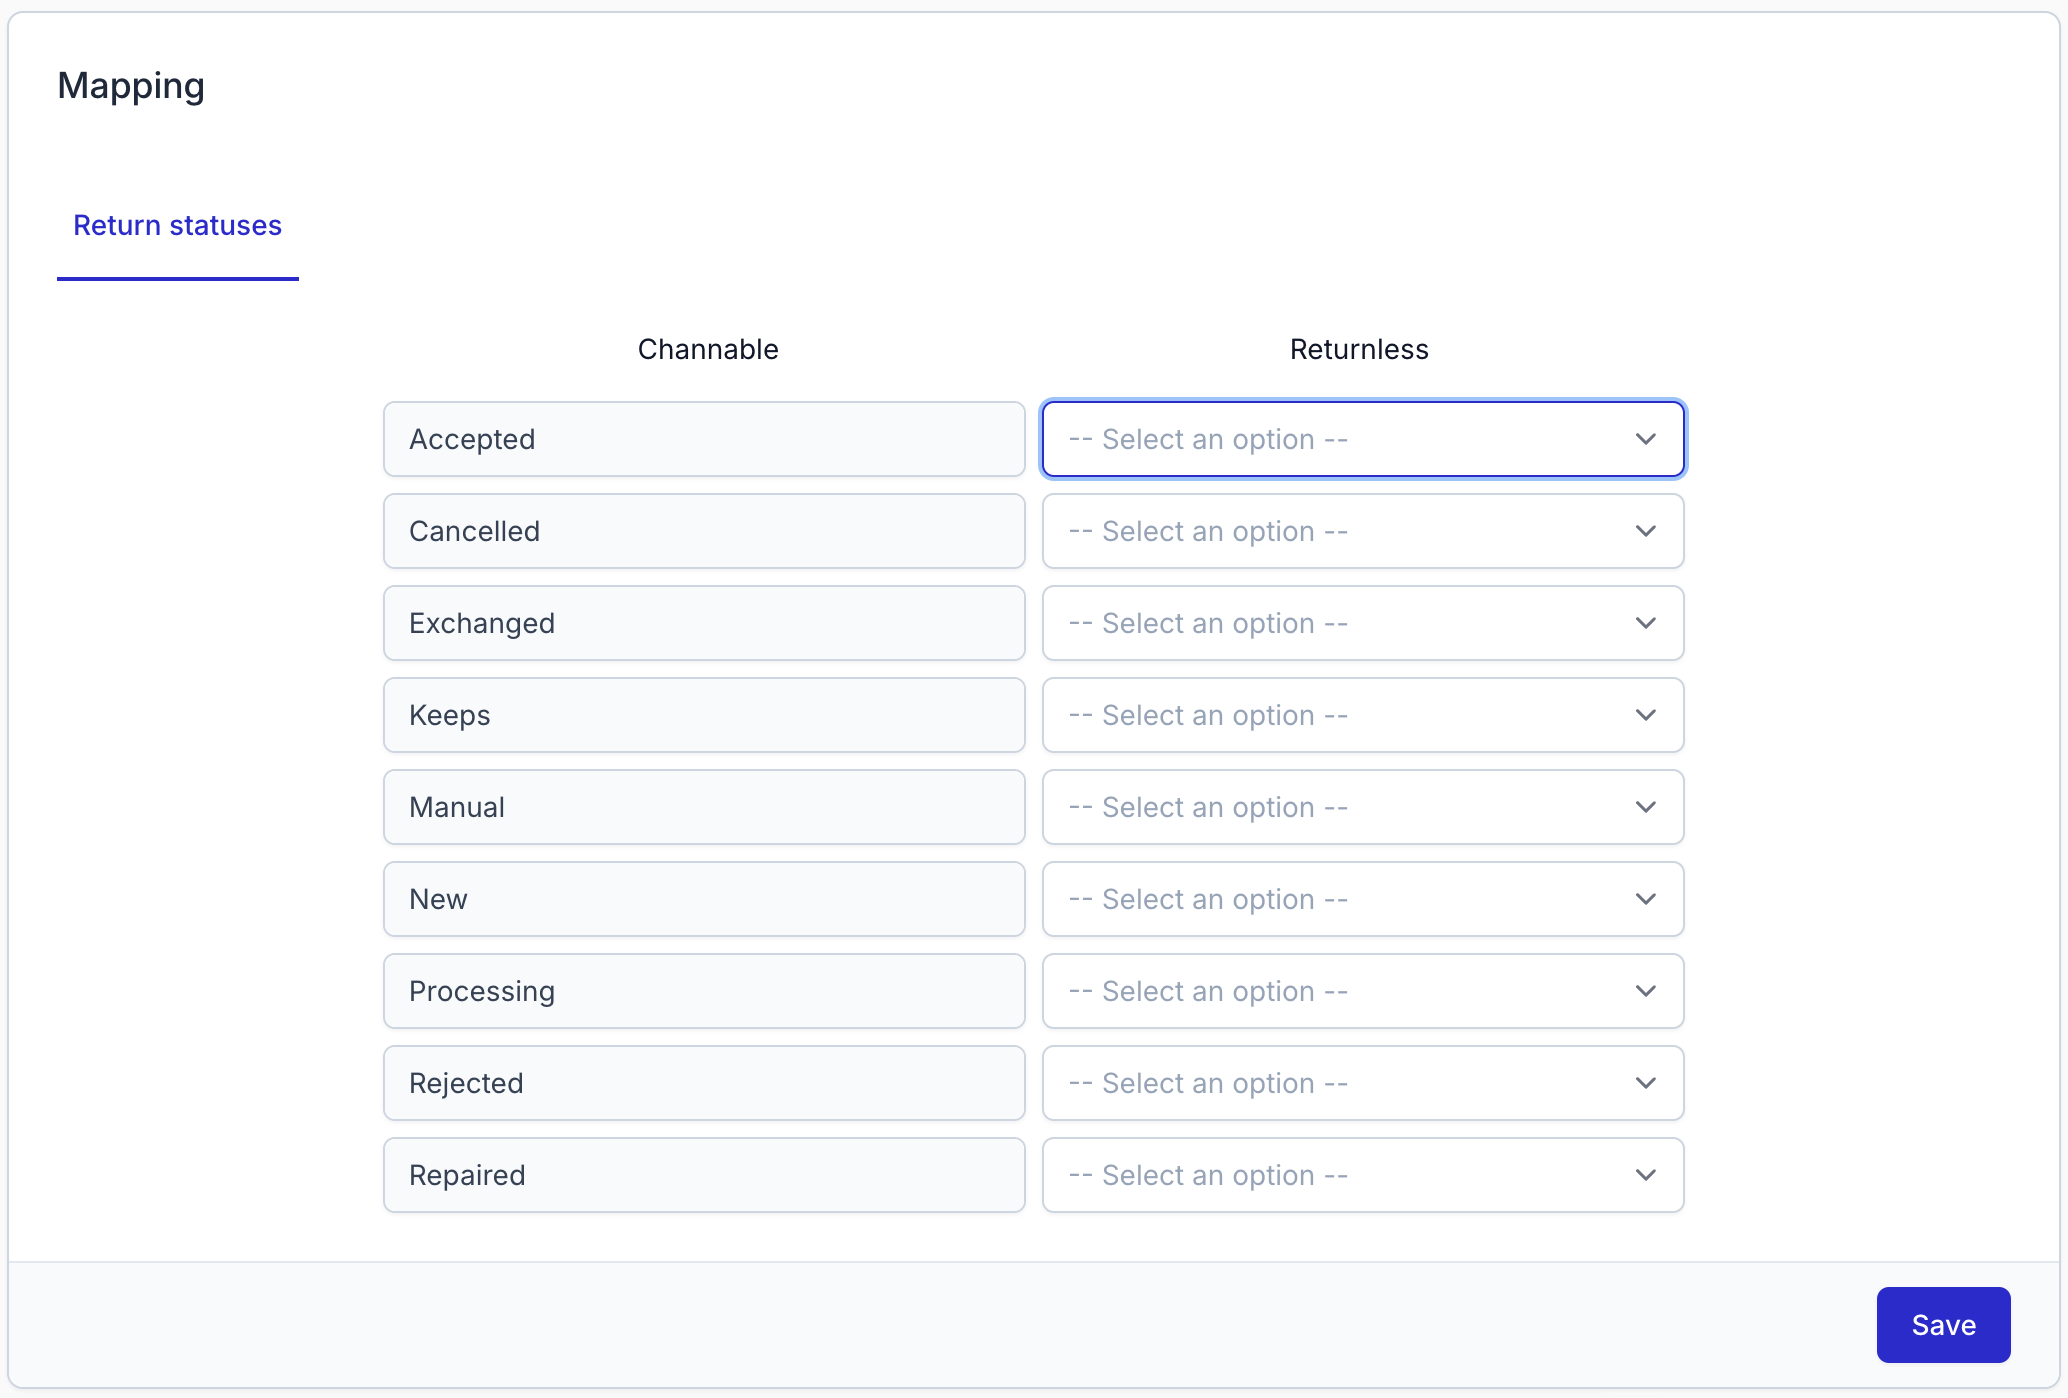
Mapping settings
When returns are imported, each return will get a return status which corresponds to the status in Channable. The integration allows Channable return statuses to be mapped to Returnless statuses. When a return is imported, the status will be converted to the selected Returnless status.
The left side shows the Channable statuses. On the right side, the Returnless status can be selected which the left status should be converted to.
If the provided mapping cannot be used, the default return status will be used for the return instead.
Finalize return
The finalize return action is only supported for imported returns that are already available in Channable.
Once a user initiates a finalize return, Returnless will mark the complete return in Channable as accepted. Channable will then initiate a refund via the channel/marketplace.

More information on how Channable handles returns can be found in the Channable article 'How do order returns work with Channable's order connection?'.