Custom SMTP
Returnless allows you to send all Return Process email notifications through your own SMTP server. This ensures that emails come directly from your webshop’s email domain and sender address.
Important: When switching to your own SMTP server, you become fully responsible for email deliverability, including spam filtering, DNS configuration, and server reliability.
Configuring a Custom SMTP Server
To access the SMTP configuration:
- Navigate to Settings → General settings.
- Scroll to the Custom SMTP section.
You will see a form similar to:
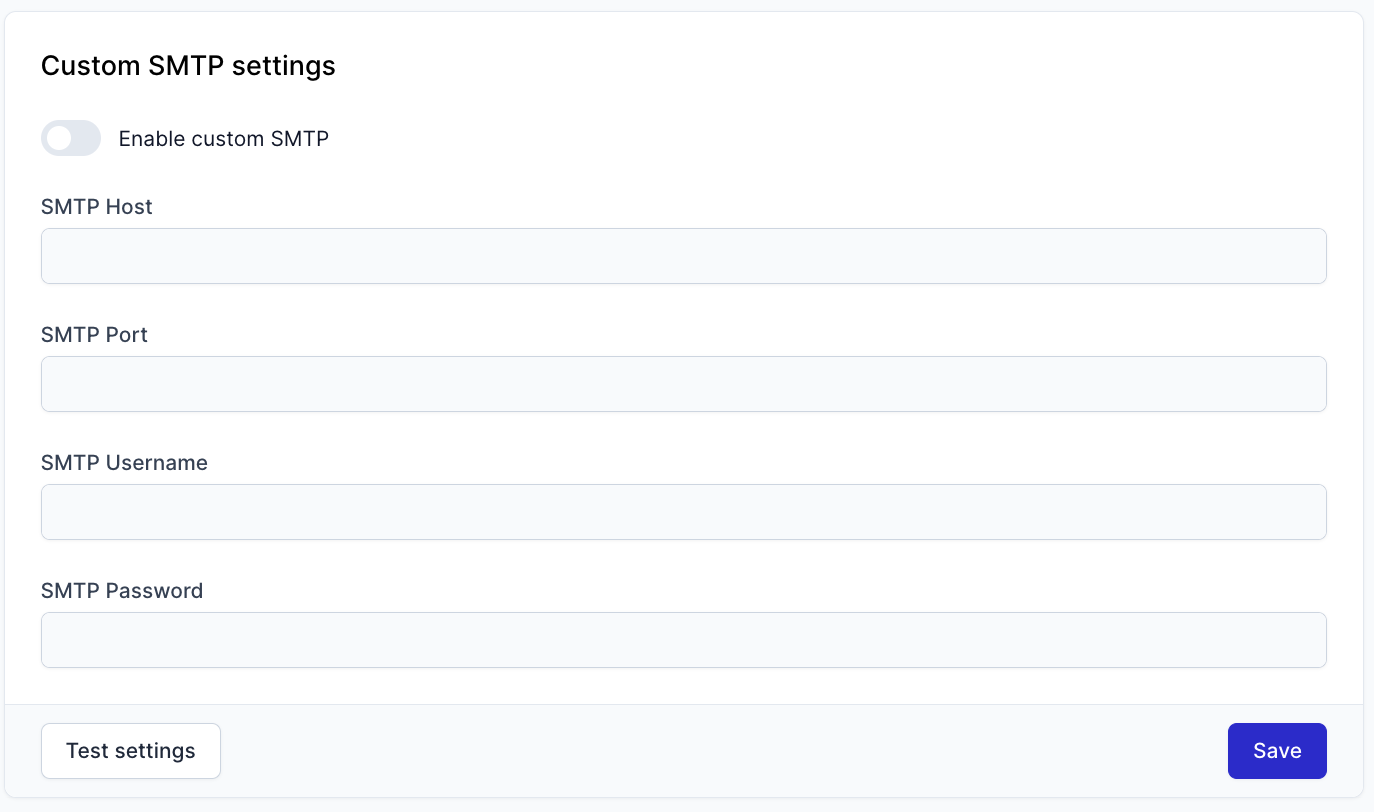
Fill in the fields according to your SMTP provider’s requirements. These values will be used to send all Returnless email notifications.
Before enabling the custom SMTP server, you can click Test settings to confirm the configuration is valid.
Using Gmail as Your Custom SMTP Server
If you prefer to send Returnless emails from your Gmail account, follow the steps below.
Note: Gmail requires an App Password for third-party SMTP use. You cannot use your regular Gmail password.
1. Enable Two-Step Verification
Google requires 2-step verification to generate an App Password.
You can follow Google’s official guide to enable it.
2. Create an App Password
- Open Google App Passwords and sign in.
- Under Select app, choose Mail.
- Under Select device, choose Other.
- Enter a name (e.g., Returnless), then click Generate.
- Copy and save the generated App Password.
This password will replace your normal Gmail login password in your SMTP configuration.
3. Configure Gmail SMTP Settings in Returnless
Go back to Settings → General settings → Custom SMTP and configure the fields as follows:
- SMTP Server:
smtp.gmail.com - SMTP Port:
587(TLS) or465(SSL) - SMTP Username: Your Gmail email address
- SMTP Password: The App Password generated in step 2
Use Test settings to confirm your configuration.
Sender Email Settings
When a custom SMTP server is active, Returnless automatically uses your Customer support email as the sender of all email notifications.
To configure this:
- Go to Settings → Return forms → Return form settings.
- Update the Customer support email field.